Shaggy 473, Our friend
Towerworker is right about everything. Harley-Davidson changed over to the purple tinted full synthetic DOT5 oil long ago and 'experts' noted that system seals need to be different from DOT3/4 designs. I would say that still applies to all other non-DOT4 "oils".
What I also found out is that that the OilHead slave cylinder has a service life that is shorter than near identical DOT3 systems on many Japanese bikes, possibly because the car type dry clutch requires a higher actuation force to release it -and- there is NO running slave/pushrod/clutch freeplay when the OilHead clutch lever is fully released. The relatively strong internal slave piston spring makes any freeplay
less than zero. That steady spring pressure means the slave piston's tiny, sealed ball bearing is always spinning under an axial load whenever the engine is running.
Shaggy 473, your 2002 model very likely does not have it's original clutch slave assembly. With your bike's 14 years of age I recommend you take the time to remove and completely disassemble the slave and the master cylinder for cleaning. Just be sure to remove and isolate any rubber seals before using the spray brake cleaner!!
Everyone well north of the equator is now in degrees of winter with weeks/months of rider down time. I seriously advise you to put that down time to good use with an off schedule DOT4 clutch (and brake?) servicing . . . . serious enough for this detailed post. You'll have plenty of time to order, wait for, and then install the replacement parts IF needed. What follows was extracted and modified from my very old slave bleeding post, so you can quickly service a cleaned/new/dry slave system:
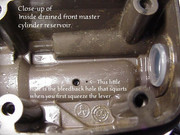
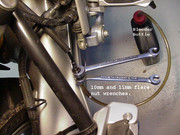
Bleeding the clutch slave is very easy, even with the entire system brand new clean, dry -and- with no special bleeding equipment available to you. What has to understood is that air and air bubbles always want to float upward when submerged in liquids and trying to force tiny air bubbles downward to the bleeder hose can be an exercise in futility. Put the bike on the centerstand, then with a helper, tilt the bike over enough, each way, to sequentially insert a one inch thick board under each centerstand foot so that the rear wheel is 3+ inches (76+mm) higher than the front wheel. That front down tilted position (Remove the bags and trunk!) ensures that any air bubbles will go to the rear of the slave cylinder internal body, where the bleeder is located. Next, turn and secure the steering to the right steering stop, effectively orienting the tiny bleedback hole at the bottom of the Master Cylinder (MC) is now higher than the attached Banjo bolt line fitting. Then you fill the empty MC reservoir to 3/4 full from the reservoir's top opening "spill over point" and open the bleeder with an attached bleeder hose dunked in a container. Now, if the MC is clean and the lever freeplay is adjusted properly, it should (VERY) slowly partially drain into the slave chamber by gravity. It also may not. That is when you SLOWLY squeeze the lever in, a short distance until minute pumping resistance is first felt, and fully out, 7+ times, to purge tiny air bubbles out the MC reservoir's tiny bleedback hole. Then try a bleeding routine, pumping mostly air, with different pause times:
1--Open bleeder.
2--Squeeze lever to bar and hold 5 seconds.
3--Close bleeder
4--Release lever quickly and wait 5 seconds.
5--Repeat
Those 5 second wait times allow very low pressure air to move thru small bleeder fitting openings. Watch the reservoir fluid level and use the rectangular lid's attached rubber bellows to cap any lever induced upward fluid spurts. Once you feel resistance that shows the clutch is releasing, it says that most of the air has been expelled. Do this:
1--With the steering held to the right steering stop, bleeder closed, slowly squeeze the clutch lever to the bar.
2--Release lever quickly and wait 5 seconds for air bubbles to combine
3--Cycle the clutch lever in-n-out within the very short freeplay zone before pumping pressure starts 5+ times, to allow any hidden air bubbles to go Up-n-Out the MC reservoir bleedback hole. You will see them bubbling up thru the liquid until steps 1 to 3 generate less and less air bubbles until there are none . . . only liquid moves the standing fluid surface.
4--Bleed the slave cylinder like this:
a--Squeeze lever to the bar and hold it there.
b--Rapidly open bleeder then close it.
c--Release lever then repeat from step (a).
5--Using the bleeder to cycle the slave piston in-and-out helps purge air and older trapped fluid.
6--When air bubbles stop, you are done!
Some thumbs for you to load pics for clarification.