
Throwing this out there ..Im sure there are several opinions but looking for easiest short of taking my bike to the shop.. Does anyone have a fullproof way without special tools to find Top Dead Center to do a Valve adjustment. All the videos Ive looked at its hard to tell exactly how to determine..So Im looking for a method i can do a correct Valve Adjustment on my R with it on the center stand ..IE dont have a proper lift ..Willing to go buy extra tools to aide in the process ..(already have the feelers, Torque and wrenches to turn the bolts)..Just want to make sure its done right before I put her back together..
Any advice???
Valve Adjustments and the like..
Moderator: Moderators

Re: Valve Adjustments and the like..
You'll find the info and pictures you need here.
Jim
2008 K1200GT
2002 R1150R (Black) - SOLD
2000 Suzuki Bandit 1200S
Lifer # 720
2008 K1200GT
2002 R1150R (Black) - SOLD
2000 Suzuki Bandit 1200S
Lifer # 720
Re: Valve Adjustments and the like..
here is a good video on you tube that uses 140 mm as a measurement from top of piston head to outside of feeler guage. not sure the language but I used this technique with a steel rod and measured off 140mm from one end and put the other end where the spark plug was and when I turned the rear wheel till the mark on the rod lined up with the feeler guage I was spot on. http://youtu.be/iVplES7DROk. or do youtube search r1150r valve adjustment.
-
riceburner

- Basic User
- Posts: 3809
- Joined: Fri Mar 18, 2005 7:54 am
- Location: Hiding in your blind spot....
- Contact:
Re: Valve Adjustments and the like..
remove all the plugs
remove the alternator belt cover
use a 16mm socket to rotate the engine via the bolt on the alternator belt pulley - ONLY rotate the engine clockwise.
remove the cylinder head cover (watch the oil drips)
push a longish tool (long allen head tool, long screwdriver - whatever) into the main plug socket GENTLY until it reaches the piston's top surface.
watching the valves rotate the engine through a complete otto cycle (suck, squeeze, bang, blow). Watch the valves and gently hold the long tool against the piston as you do so.
Rotate the engine a few times until you get the hang of the valve positions for each stroke of the engine - and make a note of the exact position of the long tool - ie -where it is stopped with the piston at it's highest point.
The inlet will be open during the 'suck' stroke (piston going deeper into the engine).
The exhausts will be open during the 'blow' stroke (piston coming up).
The TDC you want to find is the top of the 'squeeze' stroke.
Or take the little plug out of the right side of the casings just above the injector housing and, using a torch, look for the 'OT' (IIRC) tab. That will mean that both pistons are at TDC - but you need to check which one.
The valve rocker will be able to be moved when the valve is fully closed - they are both full closed only at the Top of the 'bang' stroke.
remove the alternator belt cover
use a 16mm socket to rotate the engine via the bolt on the alternator belt pulley - ONLY rotate the engine clockwise.
remove the cylinder head cover (watch the oil drips)
push a longish tool (long allen head tool, long screwdriver - whatever) into the main plug socket GENTLY until it reaches the piston's top surface.
watching the valves rotate the engine through a complete otto cycle (suck, squeeze, bang, blow). Watch the valves and gently hold the long tool against the piston as you do so.
Rotate the engine a few times until you get the hang of the valve positions for each stroke of the engine - and make a note of the exact position of the long tool - ie -where it is stopped with the piston at it's highest point.
The inlet will be open during the 'suck' stroke (piston going deeper into the engine).
The exhausts will be open during the 'blow' stroke (piston coming up).
The TDC you want to find is the top of the 'squeeze' stroke.
Or take the little plug out of the right side of the casings just above the injector housing and, using a torch, look for the 'OT' (IIRC) tab. That will mean that both pistons are at TDC - but you need to check which one.
The valve rocker will be able to be moved when the valve is fully closed - they are both full closed only at the Top of the 'bang' stroke.
Re: Valve Adjustments and the like..
I remove the rubber plug, put the bike in 6th gear and rotate to the OT mark. (Bumping it gently when close). You have a 50/50 chance it is for the side you are working on. Either they move or they don't. If nothing moves, just go around again!
If they are tight both times, then you have a problem!
If they are tight both times, then you have a problem!
'02 in black - the real BMW color! (Now gone to a new home)
Vann - Lifer No. 295
Vann - Lifer No. 295
-
CycleRob

- Honorary Lifer
- Posts: 2857
- Joined: Mon Mar 21, 2005 12:29 am
- Location: Enjoying retirement in Gainesville GA. USA
- Contact:
Re: Valve Adjustments and the like..
After 40+ years of 4 stroke engine, father/brother inspired wrenching experiences before getting my 1st BMW the end of July in 2002, here are some valuable Cautions, Corrections and ShortCuts:
Caution
1--Absolutely Do NOT remove ANY spark plugs before doing a valve adjustment!! * (see asterisked paragraph far below)
2--Only use a quality box-end wrench to loosen/tighten the adjuster lock nuts. Use the 10 year old girl strength to tighten the fine thread oil lubricated lock nuts.
3--Keep the feeler gauges wiped clean of the fine grit they may easily pick up every time they are set down.
4--Do Not use a torque wrench to tighten the valve cover bolts. Do NOT over-tighten them by hand on the re-instal or when oil leaks/weeps appear later on. Those "bolts" are just long extensions to the actual head that tightens (all at once!) against the cylinder head without a tightness indicating lock washer. Look at the bolt's threaded end! By the time you react to the torque wrench click/clack, the necked down threaded portion can break off inside the cylinder head. Then it SUX-2-B-U !
5--Right after each cylinder's intake and exhaust valve pairs are finally set correctly, put a drop of oil on each valve tip, where the feeler gauges rubbed most all the oil film away. That oil prevents the flat mating surfaces from actually touching each other. Then carefully put that valve cover on, moving straight inward keeping both gasket surfaces parallel in every direction, so as to NOT dislodge the front lower rubber bumper chunk or the sparkplug tunnel rubber gasket. Look into the sparkplug hole to see if the rubber gasket shows all-the-way-around. If it does not, remove the cover, re-install the rubber gasket, check the rubber bumper chunk and try again.
6--When re-installing the front belt cover, force the vertical oil line's bracket into bolt hole alignment so the lower right screw (and the other 3) can be threaded in by hand. Any other spinning tool "method" risks cross threading those screws, messing up the Aluminum threads in the front engine cover.
Corrections
1--Absolutely Do NOT remove ANY spark plugs, regardless of what famous person or professional internet video tells you to do so!! (see * below)
2--To turn the engine, remove the black plastic (or Chromed plastic) front cover and turn the crankshaft bolt with a 16mm box wrench. You need to inspect the alternator belt anyway. YOU will be the one that suffers when/if the belt fails, at the worst possible time (of course). You may then remember me saying "I told you so".
ShortCuts
1--Do not remove any spark plugs. The varying resistance to turning against the compression stroke helps you find TDC quicker and easier when slowly turning the crankshaft with your 16mm box wrench. After you find and position the timing hole TDC "OT" indicator mark, mark or paint an alignment mark on the crank pulley at the convenient Nine O'Clock position where you paint or punch the perfectly aligned stationary "pointer" mark in the Aluminum casting. That really speeds up your next valve adjustment (and belt inspection).
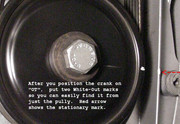
2--Use 2 feeler gauges removed from it's hand assembly set. If the (about $5) multi gauge metric handset is riveted together, drill the handset's rivet head out and use a small bolt+nut to take it's place. Then you can use one feeler to span both valves, where if you used 2 feelers, one always seems to fall out to the floor while your making the other one's adjustment.
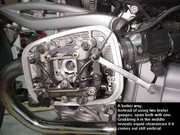
3--Do not turn the engine an additional turn if you find that the cylinder is on TDC of the valve overlap stroke. Save time and just walk over to the other side's already at TDC compression stroke on that cylinder and check/adjust that one FIRST. (Duh)
4--Before removing the valve covers for a valve check/adjust or just for an oil change, using sensible caution, tip the bike over sideways and hold the bike there a while to empty the oil pockets in each valve cover. It minimizes the plop-splat of oil when the valve cover comes loose, often some missing the drain pan. For an oil change it gets more dirty oil out, especially if tilted AGAIN after the sump has already been drained out to occasional drops. This is one of those optional "Mind-over-Matter" situations . . . . If you don't mind, it doesn't matter.
* Spark Plug Removal
You do not remove any spark plugs because doing so loosens carbon particles/powder surrounding the spark plug threads, which immediately falls on the combustion pressure sealing valve and seat surfaces of at least ONE of the lower already open intake and/or exhaust valves. On ALL the 4 valve Boxer engines there is ALWAYS at least 2 valves open at ANY degree of crankshaft position. From the valve open/close degree timing specs it is a mathematical certainty. When you turn the engine to adjust the other cylinder, 1 or 2 gritty valve seats of 1 cylinder will close down on that hard carbon powder, holding the valve(s) very slightly open. You then unknowingly measure those held slightly open valve(s), finding them as being too loose, so you then reduce the clearance(s). When all done, you start the engine and that trapped carbon grit blows away, into the cylinder (If on intake valve) and/or out the exhaust (If on exhaust valve). The 1 or 2 valve clearances immediately become way too tight and the engine most likely will not idle smoothly. It will be slower, erratic and you blame it on needing a TB synch. At some point you will have to repeat the valve adjustment and not understand what really happened.
I first learned this lesson the hard way working on a customer's kid sized Honda XR-70 dirt bike. After replacing the spark plug and then setting a careful .002"in/.003"ex valve adjustment, it had ZERO cylinder compression on the kick starter !!!!! WTF!!? I alone just did everything right! Soon after, I figured it out and readjusted the tight, negative clearanced exhaust valve, ran the engine for only 10 seconds to clear away the grit, confirmed by a smooth idle, and readjusted the exhaust valve again. From that early day forward, ALL spark plugs stay put until AFTER the valve check/adjustment. This pic linked to below shows you an OilHead, turned a quarter turn to the left from it's installed position, but you can see how carbon particles can fall (fall to the right for this pic) and land on the Intake and Exhaust valve seats. This pic below was initially uploaded to show the off center offset of the intake port, so it directs an incoming circular fuel/air swirl into the combustion chamber.
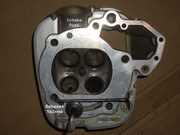
Experience is an amazing teacher. Especially if you were blessed with electrical/mechanical leaning logical thought, eager to fully understand the basics, remember it ALL and refine your procedures !
Caution
1--Absolutely Do NOT remove ANY spark plugs before doing a valve adjustment!! * (see asterisked paragraph far below)
2--Only use a quality box-end wrench to loosen/tighten the adjuster lock nuts. Use the 10 year old girl strength to tighten the fine thread oil lubricated lock nuts.
3--Keep the feeler gauges wiped clean of the fine grit they may easily pick up every time they are set down.
4--Do Not use a torque wrench to tighten the valve cover bolts. Do NOT over-tighten them by hand on the re-instal or when oil leaks/weeps appear later on. Those "bolts" are just long extensions to the actual head that tightens (all at once!) against the cylinder head without a tightness indicating lock washer. Look at the bolt's threaded end! By the time you react to the torque wrench click/clack, the necked down threaded portion can break off inside the cylinder head. Then it SUX-2-B-U !
5--Right after each cylinder's intake and exhaust valve pairs are finally set correctly, put a drop of oil on each valve tip, where the feeler gauges rubbed most all the oil film away. That oil prevents the flat mating surfaces from actually touching each other. Then carefully put that valve cover on, moving straight inward keeping both gasket surfaces parallel in every direction, so as to NOT dislodge the front lower rubber bumper chunk or the sparkplug tunnel rubber gasket. Look into the sparkplug hole to see if the rubber gasket shows all-the-way-around. If it does not, remove the cover, re-install the rubber gasket, check the rubber bumper chunk and try again.
6--When re-installing the front belt cover, force the vertical oil line's bracket into bolt hole alignment so the lower right screw (and the other 3) can be threaded in by hand. Any other spinning tool "method" risks cross threading those screws, messing up the Aluminum threads in the front engine cover.
Corrections
1--Absolutely Do NOT remove ANY spark plugs, regardless of what famous person or professional internet video tells you to do so!! (see * below)
2--To turn the engine, remove the black plastic (or Chromed plastic) front cover and turn the crankshaft bolt with a 16mm box wrench. You need to inspect the alternator belt anyway. YOU will be the one that suffers when/if the belt fails, at the worst possible time (of course). You may then remember me saying "I told you so".
ShortCuts
1--Do not remove any spark plugs. The varying resistance to turning against the compression stroke helps you find TDC quicker and easier when slowly turning the crankshaft with your 16mm box wrench. After you find and position the timing hole TDC "OT" indicator mark, mark or paint an alignment mark on the crank pulley at the convenient Nine O'Clock position where you paint or punch the perfectly aligned stationary "pointer" mark in the Aluminum casting. That really speeds up your next valve adjustment (and belt inspection).
2--Use 2 feeler gauges removed from it's hand assembly set. If the (about $5) multi gauge metric handset is riveted together, drill the handset's rivet head out and use a small bolt+nut to take it's place. Then you can use one feeler to span both valves, where if you used 2 feelers, one always seems to fall out to the floor while your making the other one's adjustment.
3--Do not turn the engine an additional turn if you find that the cylinder is on TDC of the valve overlap stroke. Save time and just walk over to the other side's already at TDC compression stroke on that cylinder and check/adjust that one FIRST. (Duh)
4--Before removing the valve covers for a valve check/adjust or just for an oil change, using sensible caution, tip the bike over sideways and hold the bike there a while to empty the oil pockets in each valve cover. It minimizes the plop-splat of oil when the valve cover comes loose, often some missing the drain pan. For an oil change it gets more dirty oil out, especially if tilted AGAIN after the sump has already been drained out to occasional drops. This is one of those optional "Mind-over-Matter" situations . . . . If you don't mind, it doesn't matter.
* Spark Plug Removal
You do not remove any spark plugs because doing so loosens carbon particles/powder surrounding the spark plug threads, which immediately falls on the combustion pressure sealing valve and seat surfaces of at least ONE of the lower already open intake and/or exhaust valves. On ALL the 4 valve Boxer engines there is ALWAYS at least 2 valves open at ANY degree of crankshaft position. From the valve open/close degree timing specs it is a mathematical certainty. When you turn the engine to adjust the other cylinder, 1 or 2 gritty valve seats of 1 cylinder will close down on that hard carbon powder, holding the valve(s) very slightly open. You then unknowingly measure those held slightly open valve(s), finding them as being too loose, so you then reduce the clearance(s). When all done, you start the engine and that trapped carbon grit blows away, into the cylinder (If on intake valve) and/or out the exhaust (If on exhaust valve). The 1 or 2 valve clearances immediately become way too tight and the engine most likely will not idle smoothly. It will be slower, erratic and you blame it on needing a TB synch. At some point you will have to repeat the valve adjustment and not understand what really happened.
I first learned this lesson the hard way working on a customer's kid sized Honda XR-70 dirt bike. After replacing the spark plug and then setting a careful .002"in/.003"ex valve adjustment, it had ZERO cylinder compression on the kick starter !!!!! WTF!!? I alone just did everything right! Soon after, I figured it out and readjusted the tight, negative clearanced exhaust valve, ran the engine for only 10 seconds to clear away the grit, confirmed by a smooth idle, and readjusted the exhaust valve again. From that early day forward, ALL spark plugs stay put until AFTER the valve check/adjustment. This pic linked to below shows you an OilHead, turned a quarter turn to the left from it's installed position, but you can see how carbon particles can fall (fall to the right for this pic) and land on the Intake and Exhaust valve seats. This pic below was initially uploaded to show the off center offset of the intake port, so it directs an incoming circular fuel/air swirl into the combustion chamber.
Experience is an amazing teacher. Especially if you were blessed with electrical/mechanical leaning logical thought, eager to fully understand the basics, remember it ALL and refine your procedures !
Last edited by CycleRob on Fri Jul 26, 2019 5:27 pm, edited 1 time in total.
`09 F800ST
Member since Sept 10, 2001
"Talent, On Loan, From God" --Rush Limbaugh--
Member since Sept 10, 2001
"Talent, On Loan, From God" --Rush Limbaugh--
Re: Valve Adjustments and the like..
Brilliant tips and instruction! Thank you, Bob.
'03 R1150R
Riding year around in central Mexico.
Don't believe anything you hear; find out!
Riding year around in central Mexico.
Don't believe anything you hear; find out!

Re: Valve Adjustments and the like..
I removed the spark plugs to replace them - did I cause damage to my engine. Is their a way for the dealer to check to see how much damage I caused. 
Harry Costello -- Jersey Shore
2007 R1200R
1974 + 75 CB125S
1971 R75
2020 Guzzi V85TT
BMWMOA 57358
2007 R1200R
1974 + 75 CB125S
1971 R75
2020 Guzzi V85TT
BMWMOA 57358
-
riceburner
- Basic User
- Posts: 3809
- Joined: Fri Mar 18, 2005 7:54 am
- Location: Hiding in your blind spot....
- Contact:
Re: Valve Adjustments and the like..
mogu83 wrote:I removed the spark plugs to replace them - did I cause damage to my engine. Is their a way for the dealer to check to see how much damage I caused.
No - you did no damage.
there MIGHT be a small amount of grit caught on a valve seat, that's what CycleRob was describing, - but running the bike will clear it. it's only an issue if you adjust the valve clearances with that grit in place.

Re: Valve Adjustments and the like..
Funny you should mention that. Checking the valve clearances, changing the fuel filter and ABS fluid plus checking the throttle body synchronisation are jobs I've just handed over to the main dealer today. I do all the other jobs.
I have got an F800ST on loan so will get on the road again when it dries up.
I know my DIY limits and in theory could do the valve clearances , having done them on older cars and bikes but I'm wary of causing oil leaks,damage and other problems with the other complex tasks.
I have got an F800ST on loan so will get on the road again when it dries up.
I know my DIY limits and in theory could do the valve clearances , having done them on older cars and bikes but I'm wary of causing oil leaks,damage and other problems with the other complex tasks.
2002 black 180 degree single spark V twin
Re: Valve Adjustments and the like..
On ALL the 4 valve Boxer engines there is ALWAYS at least 2 valves open at ANY degree of crankshaft position. From the valve timing specs it is a mathematical certainty.
CycleRob, dare I ask you to explain this to an empirical engine enthusiast?
Compression i.e. closed valves are necessary on at least most of the compression and power strokes surely?
CycleRob, dare I ask you to explain this to an empirical engine enthusiast?
Compression i.e. closed valves are necessary on at least most of the compression and power strokes surely?
2002 black 180 degree single spark V twin
-
riceburner
- Basic User
- Posts: 3809
- Joined: Fri Mar 18, 2005 7:54 am
- Location: Hiding in your blind spot....
- Contact:
Re: Valve Adjustments and the like..
Yes, true, for the cylinder that is at the top of the firing stroke.gregor wrote:On ALL the 4 valve Boxer engines there is ALWAYS at least 2 valves open at ANY degree of crankshaft position. From the valve timing specs it is a mathematical certainty.
CycleRob, dare I ask you to explain this to an empirical engine enthusiast?
Compression i.e. closed valves are necessary on at least most of the compression and power strokes surely?
the OTHER cylinder is at the top of it's exhaust stroke at the same time (boxer engine remember - both pistons are at TDC and BDC simultaneously, but 180 degrees apart on their firing cycle)- exhaust valves are open (or just closing), and the inlets are just opening.
this image doesn't show the valves sadly.
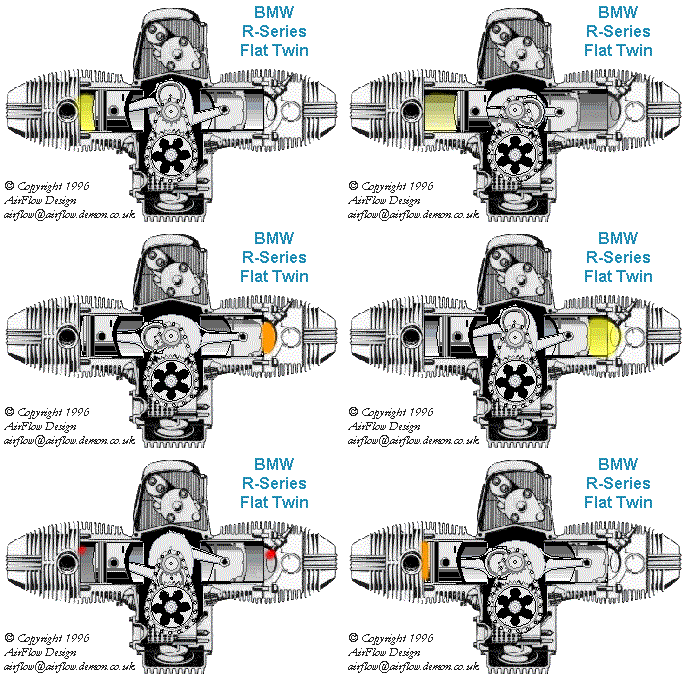
So - Rob's point is that wherever you position the cylinders when you remove the plugs there will be a set of valves open for grit to fall into from the plug threads which protrude slightly into the firing chamber and will be caked with combustion debris (especially in a poor running engine).
The obvious solution (admittedly only for twin-plug heads) is to only remove the lower plugs (grit shouldn't fall 'up'!) , and then find the firing stroke TDC for one cylinder at a time*, and remove that cylinder's plug at TDC on firing stroke, when all valves in THAT head are fully shut. Bit of a longer procedure, but should prevent Rob's scenario of maladjusted valves due to grit in the valve seat.
* - Rotate the crank using the alternator pulley nut, with a finger over one of the lower plug holes. The compression pressure on your finger should be fairly obviously different on compression and exhaust strokes, so you can tell which stroke you're on reasonably early in the piston's upward movement, and you can them move your eyeline round to the indicator on the starter ring (viewed through the window behind the rhs cylinder.)

Re: Valve Adjustments and the like..
that animated gif cutaway is pretty slick!
yeah he means whole engine, theres two valves open. not in just one cylinder. of course theyll all have to close for compression.
yeah he means whole engine, theres two valves open. not in just one cylinder. of course theyll all have to close for compression.
2002 R1150R. Helmets save more lives than loud pipes.
Re: Valve Adjustments and the like..
I never remove a plug for valve clearance check, why do that. Pull the front cover and use a socket to rotate the engine to the timing mark on the fly wheel and one of the cylinders will be at top, so do the one that is first. Good time to inspect the belt as well. People who rotate the wheel are making it hard on themselves.
mike Mojave CA
'04 ROCKSTER
'04 ROCKSTER