R12R Classic Tubeless Tire Conversion

Topics related to the ownership, maintenance, equipping, operation, and riding of the R1200R.

Moderator: Moderators

Post Reply
Neuro Rider
Basic User
Posts: 14
Joined: Thu Feb 21, 2013 7:58 pm

R12R Classic Tubeless Tire Conversion

Post by Neuro Rider »

This post describes my experiences sealing the spoked rims on an R1200R Classic so that tubeless tires can be used without the innertube that is standard on the stock bike. The conversion I performed is based on the Japanese “Outex kit” (Kit FR355, purchased on ebay, arrives in about a week) with some modifications suggested by posts on the advrider forum by the wheel guru Woody (of Woody’s Wheel Works in Denver). Because the R1200R Classic model does not have the factory option of a tire pressure monitoring system (TPMS), I also installed an aftermarket Doran TPMS so that tire pressure could be monitored in the tires after the tubeless conversion.

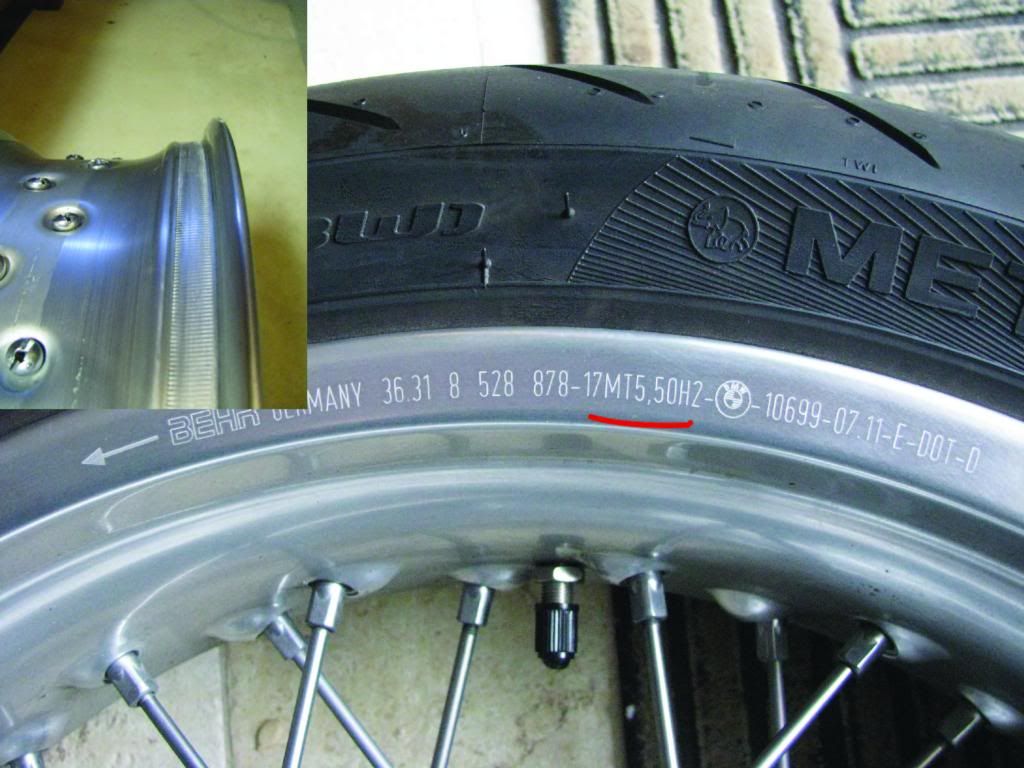
The first thing to note (see photo below) is that the Classic’s spoke wheel rims are marked MTH2 on the side wall and, as shown in the photo inset, there is a 5 degree reverse slope on the textured area next to the bead seat leading to a bump that together are designed to keep the tire on the rim if the tire goes flat. More info on MTH2 cross section rims can be found on Snowbum’s airhead site (http://bmwmotorcycletech.info/section6.htm). I have seen closeup photos of R1200GS cross spoke wheel rims that also had an MTH2 designation; these GS rims are used with tubeless tires (and no tube). Thus there appears to be no safety issue in converting the R1200R Classic rims to tubeless because the bead mounting area of the rim is the type that is typically used for tubeless tires.


Image

The outex kit is based on a two layer thick system consisting of a thick flexible adhesive strip and a durable plastic cover that together seal the spoke nuts on the inside of the rim. After removing the tire, tube, and rim protector rubber strip covering the nuts, I cleaned the inside of the rim with acetone. Woody suggests putting a layer of gap-forming cyanoacrylate glue (i.e. thick crazy glue) in the spoke hole and around the base of each nut to provide a solid foundation that prevents the strip from pushing down into the cracks under pressure and eventually forming micropores. The process I used is shown in the figure below. I first used a small sanding disk on a Dremel to smooth off the rough edges (upper left inset) on each spoke nut to produce a smooth surface (middle upper inset). After they were all sanded, I then scrubbed around each nut with soapy water (dish soap), using a toothbrush to remove any sanding residue; I then used hot water to thoroughly rinse off the soap residue and let the rim thoroughly dry. After this preparation, the nuts were filled in with rubberized cyanoacrylate glue (Bob Smith Industries IC-2000, 1oz. size). This glue is black in color and surrounds the nut and fills the thread hole. The trick is to apply it in thin layers (<0.5mm thick) and spray on a mist of accelerator (Bob Smith Industries Insta-set Accelerator Spray-2oz.) through a paper mask (upper right inset) for EACH layer. This filling-in must be done for each nut in a series of thin layers (<0.5mm thick) in order for the glue to harden properly. If you put it all on in one step and then spray the accelerator, only the glue on the surface hardens. I found it convenient to hold the rim during this gluing by having the lower half of the rim sit in the opening of a plastic crate on the floor.

Image

I cleaned the rim again with soapy water, rinsed thoroughly with hot water, and then let it dry. The process I used for applying the adhesive strip, covering, and valve (which comes with kit) followed the instructions in the kit. The only additional step I took was to measure the width of the adhesive strip and then put pencil marks next to each spoke nut, as shown (red arrows) in the figure below, that indicated the expected edge of the strip if it were properly centered over the spoke nuts. This was a great help when slowly pressing on the adhesive strip, because otherwise it is too easy to get it off center as you go around the rim. I also cut the strip at an angle (instead of perpendicular to its length) where the junction occurs between two spoke nuts. This is shown in one of the installation videos available on the Outex website, but not clearly indicated on the instruction sheet that came with the kit. The kit comes with circular adhesive pads to put over the spoke nuts before installing the strips. Given that the nuts were filled with the rubberized glue, I don't think it is necessary. However, I decided to put the pads on the nuts in the front rim and no pads on the rear, to test it out both ways. I suspect there will be no differences down the road.


Image

The photo below shows the installed sealing strip. The metal bolt-in valve that comes with the kit is high-quality and it fits in the existing valve hole perfectly without the need to enlarge the hole. This means that if you end up not liking this sealing system, you can just revert back to the tube set-up, as you have not altered the rim.

Image

The tires I chose (Michelin Pilot Road 3) went on the rims fine using two short, and one long, tire spoons (and a NoMar stand for holding the rim while mounting). I static balanced the wheels (after installing the TPMS sensor on the valve ) using a Parnas axle assembly (BG12 kit, marcparnes.com).

I purchased the Doran Model #360M TPMS system to monitor tire pressure on the tubeless rims. Installation was straightforward. As shown in the photo below, I mounted the display on the handlebar next to the clutch control lever. The only wiring required is power for the unit; in my case, the power wire was led under the gas tank to an Eastern Beaver switched fuse panel I had previously installed under the seat. As shown in the inset, the sensors mount on the valves and fit easily in the area between spokes.

Image

I performed the whole installation about 6 weeks ago and set the tire pressures to the factory recommended 36 PSI front, 42 PSI rear. It's been cold in NJ and I have only put about a hundred miles on the bike since the installation, but so far the pressures have not dropped at all (measured at 50 degrees; the pressure changes with temperature) since I first set them 6 weeks ago. With the inner tube setup I had previously, I needed to top up the pressure every few weeks, so this is already an improvement. Of course, only time (and miles) will tell if this is a good system on the R12R Classic. But so far I have been very pleased with how the conversion went.
Snapping Twig
Basic User
Posts: 120
Joined: Tue Apr 10, 2012 12:57 am

Re: R12R Classic Tubeless Tire Conversion

Post by Snapping Twig »

Nice work-around!

If the Classic had tubeless and TPM, I would have bought it.

Well done.
User avatar
SF_Hooligan
Lifer
Posts: 307
Joined: Sun Aug 28, 2011 11:43 am
Location: Oakland, CA
Contact:

Re: R12R Classic Tubeless Tire Conversion

Post by SF_Hooligan »

Man, this is so great - thanks for the post. I emailed Outex a while back and have been meaning to order it for some time. I'm starting to get close to needing a rear tire and thought I might do it when I change that.

How long did it take? I commute my bike so I'll need to be able to do it on a weekend, or I'll have to ride my wife's Vespa to work. :lol:
Image
Neuro Rider
Basic User
Posts: 14
Joined: Thu Feb 21, 2013 7:58 pm

Re: R12R Classic Tubeless Tire Conversion

Post by Neuro Rider »

It took a weekend to do EACH wheel. I think it would be too much for you to do both wheels in one weekend. The slowest part is the smoothing and filling-in of the nuts. That can take 4-6 hours for one rim, depending on how anal you are. (FYI, I am not sure that the glue filling is really necessary with the Outex kit; I was following Woody's recommendations, as he seems to have a lot of experience stateside with motorcycle rim sealing in general.) I did much of the nut smoothing with a small (3/4" diameter) sanding disk, but a tapered (3/16" down to 1/8") grinding bit also was useful, using the side of the bit along the surface of the nut. You might try several different bits or sanding disks on the first few nuts to see which one you find easiest to use. Also, you want to be sure the rim is completely dry after cleaning before the glue (or the strip) is installed. I used a filtered air compressor to blow the water out of the spoke thread holes, followed by a heat gun over the rim, which speeded up drying before starting the gluing. If you don't have that option, you might at least get a couple of compressed air duster cans to blow out that trapped water and use a hair dryer. The installation of the adhesive strip itself is pretty fast, about an hour. Obviously, the total time spent also depends on how you plan on removing and installing the tires (doing it yourself or taking it to a shop). If doing it yourself, be sure to use rim protectors (I use Motion Pro) if you use tire spoons. If you are planning on using TPMS, be sure to remember to put the sensor on the valve before wheel balancing, otherwise you end up doing it twice.
User avatar
SF_Hooligan
Lifer
Posts: 307
Joined: Sun Aug 28, 2011 11:43 am
Location: Oakland, CA
Contact:

Re: R12R Classic Tubeless Tire Conversion

Post by SF_Hooligan »

Neuro Rider wrote:It took a weekend to do EACH wheel. I think it would be too much for you to do both wheels in one weekend. The slowest part is the smoothing and filling-in of the nuts. That can take 4-6 hours for one rim, depending on how anal you are. (FYI, I am not sure that the glue filling is really necessary with the Outex kit; I was following Woody's recommendations, as he seems to have a lot of experience stateside with motorcycle rim sealing in general.) I did much of the nut smoothing with a small (3/4" diameter) sanding disk, but a tapered (3/16" down to 1/8") grinding bit also was useful, using the side of the bit along the surface of the nut. You might try several different bits or sanding disks on the first few nuts to see which one you find easiest to use. Also, you want to be sure the rim is completely dry after cleaning before the glue (or the strip) is installed. I used a filtered air compressor to blow the water out of the spoke thread holes, followed by a heat gun over the rim, which speeded up drying before starting the gluing. If you don't have that option, you might at least get a couple of compressed air duster cans to blow out that trapped water and use a hair dryer. The installation of the adhesive strip itself is pretty fast, about an hour. Obviously, the total time spent also depends on how you plan on removing and installing the tires (doing it yourself or taking it to a shop). If doing it yourself, be sure to use rim protectors (I use Motion Pro) if you use tire spoons. If you are planning on using TPMS, be sure to remember to put the sensor on the valve before wheel balancing, otherwise you end up doing it twice.
Wow. I better plan ahead then. I can take do the whole thing at home - have a compressor, heat gun, Parnes balancer, etc... I'd actually been thinking of doing something under the Outext kit - just hadn't read the latest from Woody. I want it to be super-airtight.

How does the blue affect the ability to true the rum later if necessary?

As much as I love the idea of putting a TPMS on, most of the aftermarket are... well, not real pretty. I was also thinking of putting a right angle value stem on the front - it's a pain to get to the stem with the big disks.

Thanks again for posting this - awesome info.
Image
deilenberger
Honorary Lifer
Posts: 4210
Joined: Thu May 03, 2007 9:21 pm
Donating Member #: 0
Location: New Jersey USA
Contact:

Re: R12R Classic Tubeless Tire Conversion

Post by deilenberger »

Neuro Rider..

Just one comment. The need to top off the tire pressure when you were checking with tubes in the tires was likely caused by the process of checking the pressure. It's very easy to lose 1-2PSI just hooking up the gauge. The quantity of air in a motorcycle tire means much less has to be released to make a measurable change then it would on an auto tire. Having a tire-pressure-monitoring-system (TPMS) on your bike means you no longer have to hook up a gauge to check the pressure so you don't lose pressure by the action of checking the pressure.

FWIW - I've never had to top off my tires since I added a TPMS system to my bike. Mine is internally mounted, but both stems are metal so that eliminated one potential failure point.

Try to resist the urge to chase pressures. The factory pressure recommendation is at 20C (which is around 68F) - and again due to the small size of a motorcycle tire, the air inside can heat up or cool off rather quickly, making significant changes in the measured pressure. The BMW TPMS system compensates for this, and displays what the pressure would be if the tire/air was at 68F. Most aftermarket (including the Doran system it looks like you're using) don't, although they may compensate for temperature/pressure for the warning function. The system I have displays both pressure and the air-temperature inside the tire continuously, and the link between temperature and pressure is very easy to see. The change isn't exactly linear, so I can't give a formula to use.. but on mine - if the pressure is set to 32PSI (front) at 68F, when the tire is 40F, the pressure will be down around 30PSI. At a tire/air temperature of 80F - someplace around 34-35 PSI. Someday I have to take a recorder out with me and make some observations so I can plot out the change. The rear tire, having more air in it and more rubber mass, plus more power transfer - changes at a different rate then the front tire.

So - my advice - set pressure at 68K and forgeddaboutit.. (being from NJ you'll understand that..)

And what's this about being too cold to ride? I managed about 250 miles this week, primarily to/from our friendly dealer for replacement fuel strips (2 in one week - a new personal best for me!).. it just takes the right gear and the determination that you gotta ride.
Don Eilenberger - NJ Shore
2012 R1200R - I love this bike!
Clem
Basic User
Posts: 109
Joined: Sun Jun 12, 2011 11:28 am

Re: R12R Classic Tubeless Tire Conversion

Post by Clem »

That's an excellent post Neuro Rider. Great job!!!
User avatar
mogu83
Lifer
Posts: 1695
Joined: Mon Mar 19, 2007 6:40 am
Donating Member #: 0
Location: Harry Costello Jersey Shore, NJ

Re: R12R Classic Tubeless Tire Conversion

Post by mogu83 »

My 2 cents.
And I really don't want to start an oil thread but it's something that I was involved with a few years ago.

First I had a Guzzi that came with tube type tires on mag type rims (not wire). I converted to tubeless by just finding a valve stem that fit the hole. I rode that bike like that for 100,000 miles had a few flats including one heavily loaded at speed, without any major drama.
The controversy started when I posted it on the Guzzi list. The experts came out of the woodwork. Seems like tubeless rims are different than tube type rims, or so many people reported. The tube type lacks a shoulder to keep the bead sealed during a low pressure situation and could result in the tubeless tire coming off a tube type rim as it was going flat. As I said I never had a problem in many miles and neither have others that did this. When I sold the bike I told the new owner what I had done and told him it was his call to go back to tubes if he wanted to. He didn't and has put many more miles on the bike.
Just thought I'd put that here to suggest that if you do this modification explain to the next owner what you have done, just to cover your butt.
Harry Costello -- Jersey Shore
2007 R1200R
1974 + 75 CB125S
1971 R75
2020 Guzzi V85TT
BMWMOA 57358
User avatar
SF_Hooligan
Lifer
Posts: 307
Joined: Sun Aug 28, 2011 11:43 am
Location: Oakland, CA
Contact:

Re: R12R Classic Tubeless Tire Conversion

Post by SF_Hooligan »

deilenberger wrote:FWIW - I've never had to top off my tires since I added a TPMS system to my bike. Mine is internally mounted, but both stems are metal so that eliminated one potential failure point.
Don - did you end up with the system from TyreRack in the UK? Is it basically strapped to the wheel internally? I agree with your stance on valve stem mounted systems, and I'd love to have a TPMs on my bike. I'm planning to do this conversion at some point - I wonder if the strap would "irritate" the sealing strip?
mogu83 wrote:My 2 cents.
And I really don't want to start an oil thread but it's something that I was involved with a few years ago.

First I had a Guzzi that came with tube type tires on mag type rims (not wire). I converted to tubeless by just finding a valve stem that fit the hole. I rode that bike like that for 100,000 miles had a few flats including one heavily loaded at speed, without any major drama.
The controversy started when I posted it on the Guzzi list. The experts came out of the woodwork. Seems like tubeless rims are different than tube type rims, or so many people reported. The tube type lacks a shoulder to keep the bead sealed during a low pressure situation and could result in the tubeless tire coming off a tube type rim as it was going flat. As I said I never had a problem in many miles and neither have others that did this. When I sold the bike I told the new owner what I had done and told him it was his call to go back to tubes if he wanted to. He didn't and has put many more miles on the bike.
Just thought I'd put that here to suggest that if you do this modification explain to the next owner what you have done, just to cover your butt.
As noted in the OP, these rims have the shoulder to prevent that. I emailed Woody (Wheel Works) about converting mine a while back and at the time he hadn't seen a set - and he won't convert 'em if they don't have the shoulder. These rims should be fine without tubes, assuming the seal holds.
Image
deilenberger
Honorary Lifer
Posts: 4210
Joined: Thu May 03, 2007 9:21 pm
Donating Member #: 0
Location: New Jersey USA
Contact:

Re: R12R Classic Tubeless Tire Conversion

Post by deilenberger »

SF_Hooligan wrote:
deilenberger wrote:FWIW - I've never had to top off my tires since I added a TPMS system to my bike. Mine is internally mounted, but both stems are metal so that eliminated one potential failure point.
Don - did you end up with the system from TyreRack in the UK? Is it basically strapped to the wheel internally? I agree with your stance on valve stem mounted systems, and I'd love to have a TPMs on my bike. I'm planning to do this conversion at some point - I wonder if the strap would "irritate" the sealing strip?
The system I have did come from the UK (made in Taiwan).. it is the Mobiletron system. http://www.mobiletron.com.tw/b_eng_prod ... No=S000032

I managed to get them to UK-post me a system. Cost was a bit over $100. It has worked flawlessly for many miles and about 2 years so far. It does use band-mounted sensors (although there is an option to use the lump ones on the valve stems.) Would the strap irritate the sealing strip? Possible - but I suspect several layers of vinyl electrical tape around the sealing strip where the strap would touch it might make that a non-issue. From my read of the sealing system this thread covers, it sounds as if the primary seal is around the spoke nut, with the sealing strip as protection and some backup sealing.

Only way to really tell would be to try it. At least with the Mobiletron system you'd know if there was a problem (it will read tire pressure with the bike stationary right in your garage. The wheels don't need to rotate to trigger the sensors.)
Don Eilenberger - NJ Shore
2012 R1200R - I love this bike!
User avatar
SF_Hooligan
Lifer
Posts: 307
Joined: Sun Aug 28, 2011 11:43 am
Location: Oakland, CA
Contact:

Re: R12R Classic Tubeless Tire Conversion

Post by SF_Hooligan »

Thanks! I'll check that one out.
deilenberger wrote: From my read of the sealing system this thread covers, it sounds as if the primary seal is around the spoke nut, with the sealing strip as protection and some backup sealing.
Yep - although the Outex kit is designed to work by itself as well. Neuro just did the extra super awesome, multi-layer version - which I think makes sense given the critical nature of wheels and tires on a bike.
Image
Neuro Rider
Basic User
Posts: 14
Joined: Thu Feb 21, 2013 7:58 pm

Re: R12R Classic Tubeless Tire Conversion

Post by Neuro Rider »

SF_Hooligan

My suggestion would be to be extra careful with putting a band over the Outex sealing strip. The purpose of the cyanoacrylate (CA) glue around the nuts was only to provide a solid foundation so that the Outex sealing strip (or a silicone chemical sealer in Woody’s process) doesn’t force its way into recesses around the nut. It was never intended to be a seal. Standard CA adhesives definitely develop micro cracks that are not airtight. Rubberized CA might be less prone to cracking, but on my rear wheel conversion I have direct evidence that that you shouldn’t count on it being the primary seal. If you look closely at the photo of the installed sealing strip in the OP, you will see that the Outex membrane over the third nut from the left (CA is darker) looks different. It is actually conforming tightly to the CA foundation and the profile of the nut, whereas the membrane over the other nuts has a very small air pocket around the nut, producing a “mini dome”. (When installing the Outex strip, you always get a little trapped around the spoke nut.) This difference in shape is because this photo was taken after I had originally installed a tire and inflated it for a few days. I then took off the tire to see what the Outex membrane looked like, as I was curious about exactly this issue. What I found is that many of the nuts still had the residual air in the dome, but some, like the one in the photo I pointed out, had leaked air around the nut making the membrane conform to the nut and rim. This is not a problem; it is what I thought I would see on all the nuts and how an Outex membrane normally looks (after a tire inflation) on their website and videos, except that the amount of distension of the membrane is less here than on their photos because of the CA foundation making the contour smoother (that was the whole point of using the glue). My suspicion is that as the bike is ridden, the very slight movements of the nuts in the holes will cause microcracks in all of the CA rings surrounding the nuts and most, or all, of the Outex membranes will then be conformal to the CA, as it was designed to do. If they don’t do that because the rubberized CA retains a seal, then great, but I wouldn’t count on it.

I didn’t consider the Mobiletron TPMS unit for my installation because their valve protector bracket, that goes over the back of the valve (and under the band), would land close to the spoke nuts on either side of the valve hole and dig into the Outex membrane when the band is tightened. (You can see a photo of this protector in the installation manual for the band type motorcycle system that is available on their website.) The edges of the band would also go over part of the nuts around the rest of the rim. However, Don’s comment about vinyl tape made me think about the heavy rubber strip that you will find under the tube in the stock Classic wheels; it is there to protect the inner tube from the spoke nuts. I saved mine; they are 35mm wide for the front, and 60mm wide for the rear, and made of a very heavy duty rubber, 2mm mm thick. I think you could re-use these on the rim, between the Outex membrane and the band (and also under the valve protector bracket). The area around the valve is actually double in thickness so it would be good for under the valve protector bracket. But I would still remove any sharp edges on the bottom edges of the metal bracket.
User avatar
SF_Hooligan
Lifer
Posts: 307
Joined: Sun Aug 28, 2011 11:43 am
Location: Oakland, CA
Contact:

Re: R12R Classic Tubeless Tire Conversion

Post by SF_Hooligan »

Neuro Rider wrote:SF_Hooligan

My suggestion would be to be extra careful with putting a band over the Outex sealing strip. The purpose of the cyanoacrylate (CA) glue around the nuts was only to provide a solid foundation so that the Outex sealing strip (or a silicone chemical sealer in Woody’s process) doesn’t force its way into recesses around the nut. It was never intended to be a seal. Standard CA adhesives definitely develop micro cracks that are not airtight. Rubberized CA might be less prone to cracking, but on my rear wheel conversion I have direct evidence that that you shouldn’t count on it being the primary seal. If you look closely at the photo of the installed sealing strip in the OP, you will see that the Outex membrane over the third nut from the left (CA is darker) looks different. It is actually conforming tightly to the CA foundation and the profile of the nut, whereas the membrane over the other nuts has a very small air pocket around the nut, producing a “mini dome”. (When installing the Outex strip, you always get a little trapped around the spoke nut.) This difference in shape is because this photo was taken after I had originally installed a tire and inflated it for a few days. I then took off the tire to see what the Outex membrane looked like, as I was curious about exactly this issue. What I found is that many of the nuts still had the residual air in the dome, but some, like the one in the photo I pointed out, had leaked air around the nut making the membrane conform to the nut and rim. This is not a problem; it is what I thought I would see on all the nuts and how an Outex membrane normally looks (after a tire inflation) on their website and videos, except that the amount of distension of the membrane is less here than on their photos because of the CA foundation making the contour smoother (that was the whole point of using the glue). My suspicion is that as the bike is ridden, the very slight movements of the nuts in the holes will cause microcracks in all of the CA rings surrounding the nuts and most, or all, of the Outex membranes will then be conformal to the CA, as it was designed to do. If they don’t do that because the rubberized CA retains a seal, then great, but I wouldn’t count on it.

I didn’t consider the Mobiletron TPMS unit for my installation because their valve protector bracket, that goes over the back of the valve (and under the band), would land close to the spoke nuts on either side of the valve hole and dig into the Outex membrane when the band is tightened. (You can see a photo of this protector in the installation manual for the band type motorcycle system that is available on their website.) The edges of the band would also go over part of the nuts around the rest of the rim. However, Don’s comment about vinyl tape made me think about the heavy rubber strip that you will find under the tube in the stock Classic wheels; it is there to protect the inner tube from the spoke nuts. I saved mine; they are 35mm wide for the front, and 60mm wide for the rear, and made of a very heavy duty rubber, 2mm mm thick. I think you could re-use these on the rim, between the Outex membrane and the band (and also under the valve protector bracket). The area around the valve is actually double in thickness so it would be good for under the valve protector bracket. But I would still remove any sharp edges on the bottom edges of the metal bracket.
Thanks for that clarification - I had been catching up on Woody's thread over on ADV, trying to figure out if the CA glue was an additional sealer or filler.

There's another internal TPMS that I came upon on Amazon while poking around after reading this thread - from Orange Electronic. There's a thread on ADV here. It's $116 and doesn't use a band. Seems ok.

Realistically, I won't be able to get to this project real soon, but it's pretty high on my list of stuff to do to my bike. I really appreciate the writeup!
Image
Post Reply