Dr. Strangelove,
"The shaft of 13 is hollow? so you only had to drill to the center and then loop up and twist?" - - Yes & Yes.
"What size bit, type bit did you use? A dremel or a "grown up drill" ?" - - - Drill=3/32" necessary for my oversized .043" wire. Smaller is better but smaller drills are easier to break when they meet the other hole at an oblique angle. What size drill to use depends on the wire size and and other factors like will a larger hole weaken the strength of the part being drilled. If any hole will weaken the part than a custom external tab bracket should be used. I used huge .043" (1.092mm) wire because the holding power is great but mostly because it was readily available. The standard Stainless Steel .032" wire (.813mm) would be OK too. I used a stubby right angle AC power drill but a regular AC power drill should work too as it seems there's room enough for it.
"Did you check the tightness of everything before you drilled?" - - - Yes.
"The bottom nut...how is that secured by the wire, we can see the twisted end, but it looks like it is flapping in the breeze?" - - - The end that looks like it's flopping in the breeze goes thru a hole drilled into the square edge boss of the Aluminum forktube. Start the hole perpendicular to the rear vertical forktube flat machined surface about 1/8" down from the top 90deg surface until the whole cone of the drillbit is just submerged. Then change the angle toward the TeleLever and upward >45deg so the wire isn't bent to much coming out of the hole while holding the big nut. Choose the drill starting and exit points carefully as it's tight quarters. Be careful you don't break the tiny drill as it'll likely stay stuck inside the hole.
"On the bottom nut--did you just go in on the flats, by the corner, 90 and 90, met the holes and ran the wired through the bend?" - - - Almost that. I started the holes perpendicular, then once the drill cone is submerged I angled it parallel to the flat of the nut I was drilling to, going just halfway. Do the same on the other flat in the mirror image location. Push on the electric drill VERY lightly, almost zero, as you approach the other hole's bottom or the drill will jam & BREAK. Then use a drill about 4 sizes larger to chamfer both holes so there's no sharp wire cutting edges.
Boxer04, At the bike shows, I have seen safety wire jobs on Yoshimura's race team bikes ON DISPLAY that were loopy loose, functionally ineffective, severely overtwisted and even wired backwards!!! Amazingly, anything with wire "attached" passes pre-race tech inspection. My safety wire training came from the USNAF back in 1969 working on an Orion P3's four 4,000HP engines. Naval Inspectors have zero tolerance for any wire job that isn't perfect, but once you learn all the basics, it's real easy and almost therapeutic fun.
To make this easier, I'll cut my wire job off, take extreme close-up pics with the drill alone inserted, combine them to 1 big pic and UpLoad it to replace the old one. Only 1 day req'd so check back by Monday.
.
Stupid Telelever System!!
Moderator: Moderators
-
leoquattro

- Basic User
- Posts: 62
- Joined: Sun Dec 17, 2006 7:25 pm
- Location: Rome, Italy
-
CycleRob

- Honorary Lifer
- Posts: 2857
- Joined: Mon Mar 21, 2005 12:29 am
- Location: Enjoying retirement in Gainesville GA. USA
- Contact:
The deed has been redone. Wire cut off. New pics taken and combined into 1 BIG pic with all the details. Original pic deleted and replaced by this one:
http://i142.photobucket.com/albums/r87/ ... LevBig.jpg
If your drill is full sized or too fat, you won't be able to drill the top-down hole halfway into the Aluminum left fork leg's boss which avoids removing any bike parts in the way. If that's the case, you have a way to drill one all-the-way-thru hole. Since things have changed from my 2002 model, these instructions will prolly not apply directly to your newer model. You can also get one of these quality made Hand Drills . I have 2 of them - - one a Sears the other a Fiskars, both identical, used often for many years. They may be available at tool sections of Home Depot, Lowes, Ace Hardware, Sears, etc as cheap as $10 w/o the Fiskars label.
First pencil the top edge of the chromed brakeline bracket visible in the pic above (2002 model) so you know the bracket won't cover up the wire hole (duh!!). You can also utilize the existing hole in the chromed bracket to locate the forkleg's hole by making a longer penetrating hole so the wire also includes the bracket. Remove the front brake line brackets on both sides for drillbit access and drill using either hole location method. That hole, after the ridgid brake lines are taken out of the way, is start drilled straight in perpendicular, just taking out the pencil line (or using the marked bracket hole location), until the drill's cone point is submerged, then angle the drill away ~45degrees (steeper if using the bracket hole) pointing upward AND toward the TeleLever big nut's direction. Afterward chamfer the hole openings with a bigger drill, even if you have to turn the drill by hand. Good judgment, patience with excessive force, some experience & visionary spacial planning will make this part easy. Green Novices have more of a chance to screw it up creating a weak bridge, break the drill(s)

 and should leave it to their capable friend(s).
Here's the Deal: Because this can be so VERY important for safety (i.e. getting injured or KILLED!) and it enhances satisfaction and peace-of-mind, I'm making this offer; I will drill & safety wire, for a 5'er (Lincoln), any member's OilHead TeleLever that's willing/able to make the trip to my house in Gainesville GA. Also, my Ozark Mini-Bash offer to change the left tensioner (you supply) to the R1200R one, for FREE, still stands - - - so bring that with you too.
Just PM me and we'll get it done. My wife Ann will be glad to meet you.
My dog Sadie - - - not so much . . . .
.
http://i142.photobucket.com/albums/r87/ ... LevBig.jpg
If your drill is full sized or too fat, you won't be able to drill the top-down hole halfway into the Aluminum left fork leg's boss which avoids removing any bike parts in the way. If that's the case, you have a way to drill one all-the-way-thru hole. Since things have changed from my 2002 model, these instructions will prolly not apply directly to your newer model. You can also get one of these quality made Hand Drills . I have 2 of them - - one a Sears the other a Fiskars, both identical, used often for many years. They may be available at tool sections of Home Depot, Lowes, Ace Hardware, Sears, etc as cheap as $10 w/o the Fiskars label.
First pencil the top edge of the chromed brakeline bracket visible in the pic above (2002 model) so you know the bracket won't cover up the wire hole (duh!!). You can also utilize the existing hole in the chromed bracket to locate the forkleg's hole by making a longer penetrating hole so the wire also includes the bracket. Remove the front brake line brackets on both sides for drillbit access and drill using either hole location method. That hole, after the ridgid brake lines are taken out of the way, is start drilled straight in perpendicular, just taking out the pencil line (or using the marked bracket hole location), until the drill's cone point is submerged, then angle the drill away ~45degrees (steeper if using the bracket hole) pointing upward AND toward the TeleLever big nut's direction. Afterward chamfer the hole openings with a bigger drill, even if you have to turn the drill by hand. Good judgment, patience with excessive force, some experience & visionary spacial planning will make this part easy. Green Novices have more of a chance to screw it up creating a weak bridge, break the drill(s)
Here's the Deal: Because this can be so VERY important for safety (i.e. getting injured or KILLED!) and it enhances satisfaction and peace-of-mind, I'm making this offer; I will drill & safety wire, for a 5'er (Lincoln), any member's OilHead TeleLever that's willing/able to make the trip to my house in Gainesville GA. Also, my Ozark Mini-Bash offer to change the left tensioner (you supply) to the R1200R one, for FREE, still stands - - - so bring that with you too.
Just PM me and we'll get it done. My wife Ann will be glad to meet you.
My dog Sadie
.
`09 F800ST
Member since Sept 10, 2001
"Talent, On Loan, From God" --Rush Limbaugh--
Member since Sept 10, 2001
"Talent, On Loan, From God" --Rush Limbaugh--
Re: Stupid Telelever System!!
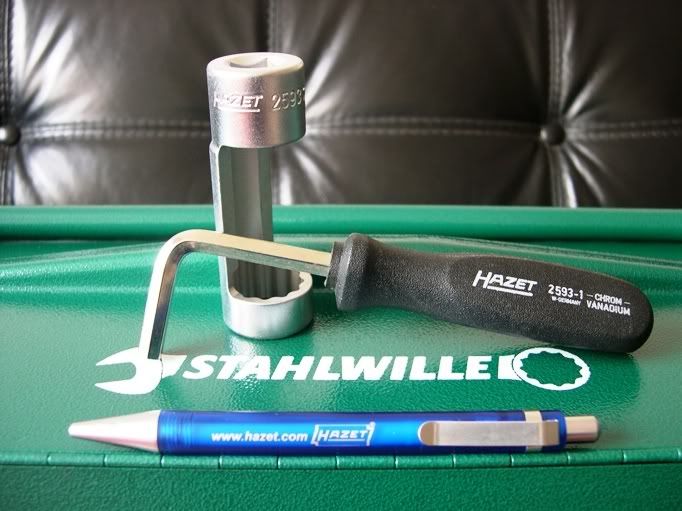
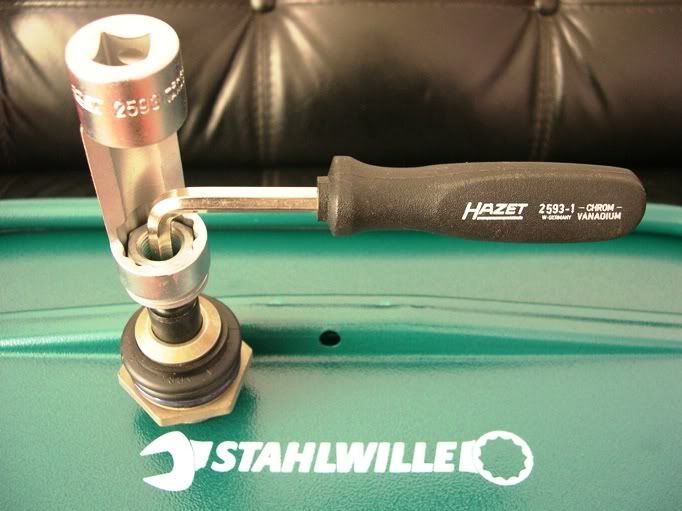
I just got this Hazet 21mm special socket and 7mm hex key from a buddy selling Hazet tools.

Clarification
I just wanted to confirm- what exactly came apart?
[numbers refer to parts image]
Did the ball joint come out of the bridge (item 13 leaves 11) or does the jesus nut come off the ball joint (item 14 off 13)?
[numbers refer to parts image]
Did the ball joint come out of the bridge (item 13 leaves 11) or does the jesus nut come off the ball joint (item 14 off 13)?

Re: Stupid Telelever System!!

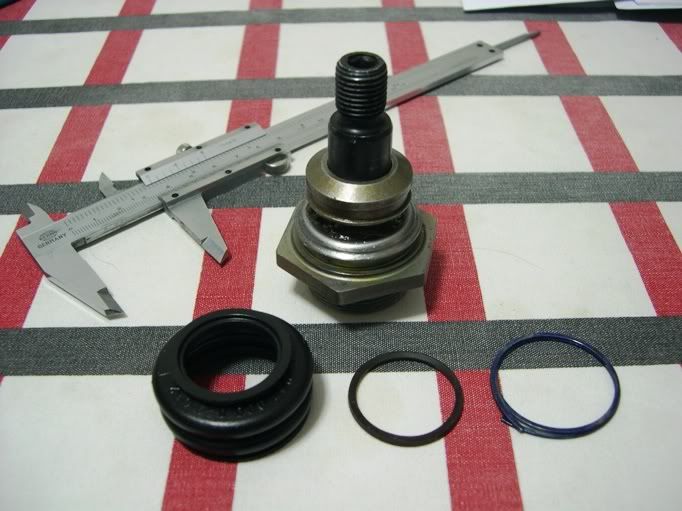
Alright, my 2002 R1150R has a torn telelever ball joint rubber bellow. The slit on the rubber bellow exposes the grease to the elements. Before things get worse, I should do something on it.
I found out a few things on this telelever ball joint.
1. BMW don’t sell the rubber bellow separately.
2. A special socket and hex key set is required to remove and to reinstall the ball joint collar nut [14] at the leading link side.
3. A 46mm flat to flat socket is required to remove the ball joint from the slider tube bridge [11].
4. A good 230Nm of torque is needed to fasten it back to the slider tube bridge [11].
I bought a new but defective (seized) ball joint online a while ago at a discounted price, my plan is to remove the rubber bellow from the new ball joint and replace the torn one on my bike with this new bellow without replacing the ball joint on my bike.
The ball joint on my bike seems good, I will give it a good clean up and repack with fresh grease before I put everything back.
Now, the question:-
The BMW repair manual call for a “new nut [14] or clean thread + Loctite2701)”
I bought a new collar nut [14], it came pre-coated with some kind of thread locker on the thread. Do I use the collar nut [14] straight from the packaging or do I still need to apply Loctite2701 when I torque it down to 130Nm?
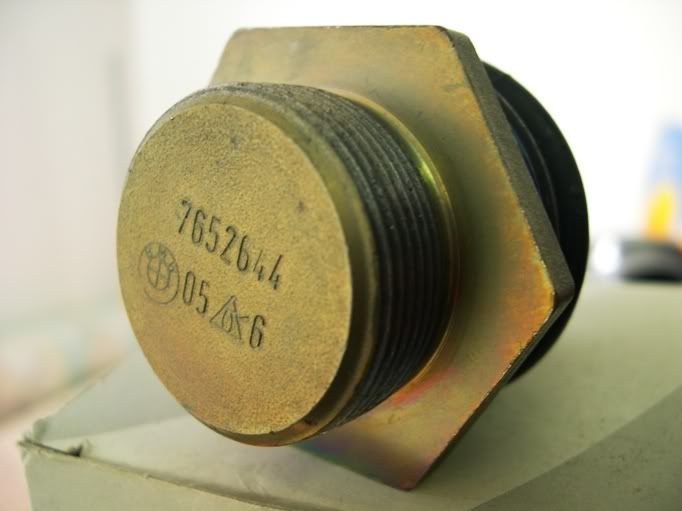

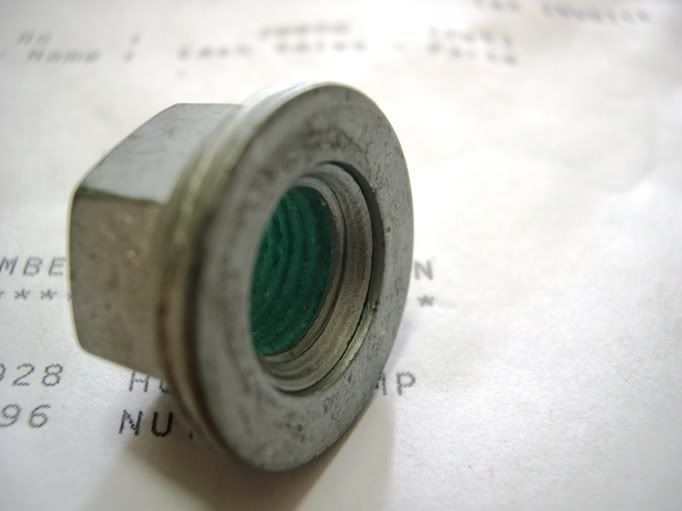
The nut [14], pre-coated with the turquoise colour thread locker