Page 1 of 2
Re: Modifications to my F800ST
Posted: Tue Aug 04, 2009 6:41 pm
by wncbmw
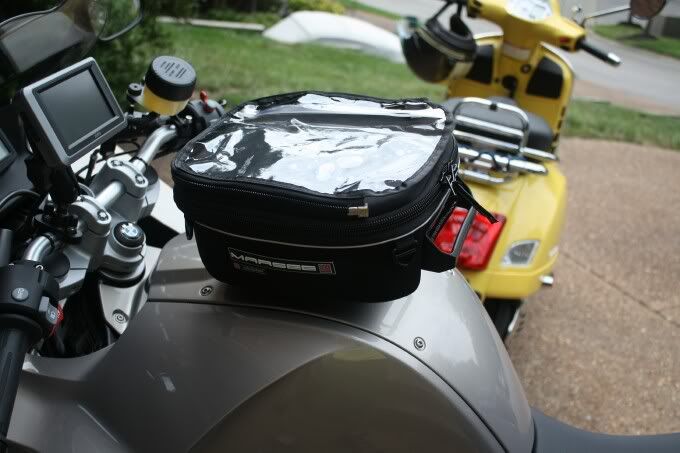
Thad - the tank bag installation came out great! Looks good.
And from our ride the weekend of the MOA, I can attest that the Motolights really make you show up from way down the road!

Re: Modifications to my F800ST
Posted: Wed Aug 05, 2009 2:08 am
by CycleRob
touchton, Nice work. The tall triangle daytime light pattern connects immediately with oncoming car driver's brains as "danger". I'm really glad you're slowly breaking out of what I consider your biggest and as far as I know, only flaw: excess modesty!!

I'm basing that on the AFAIK never documented clean farkle installations I noticed on your 1150R when it was here for the tech session.
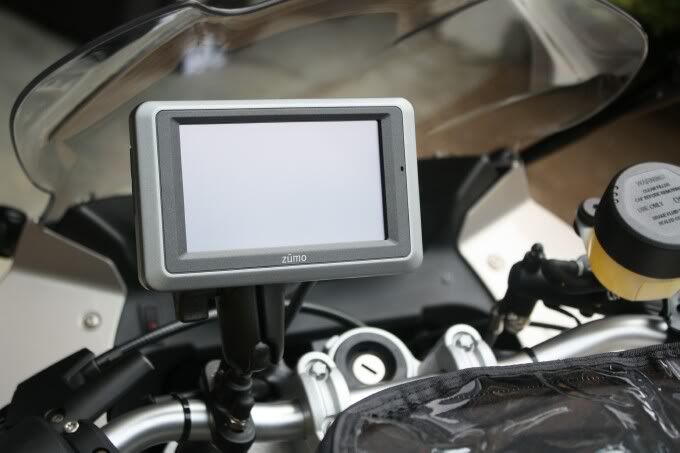
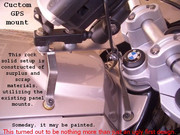
FWIW, I had a strong restraining mental block about drilling into the top plastic panel, a permanent modification scar

for my GPS RAM mounting. My current prototype #2 needs to be redesigned to use the the same 2 center top screws and a
drilled in the plastic 
front edge center hole to complete the new fanatically minimalist RAM support tripod. That'll give no direct contact with the frame which the 2 front legs right now transmit some v-low amplitude vibration to the GPS. I want it as near zero as possible.
About adding a more powerful horn, I transferred my salvaged but near new Yamaha R-6 disc horn from the 50R to the F800 using the same wires and relay. It needed a new longer bracket to mimic the BMW original. In the new bike it required a 1500ma rectifier diode to be used as an isolation diode (it absorbs spikes) between the relay coil and the stock horn's power wire. Here's the pics during installation:
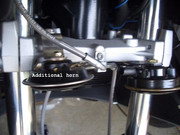
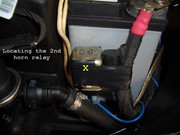
The 2 horns together when blown at pedestrians 10 feet away generates a tall air space under their shoes.
BTW, my bike just passed 2,200 miles.
Edit: To add Thumbnail Pic and change photo host away from PhotoBucket to Postimage.
.
Re: Modifications to my F800ST
Posted: Thu Aug 06, 2009 6:10 am
by Boxer
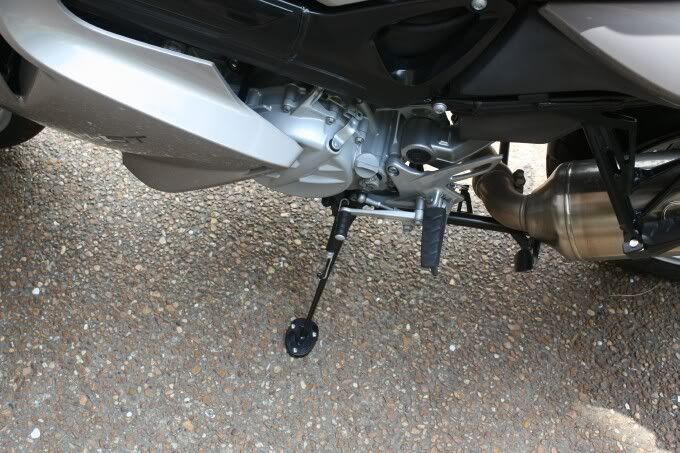
Thad. Nice work, as usual. I particularly like the larger sidestand footprint. That whole sidestand looks a little "flimsy" if you ask me. But I keep looking at the ones on the GSs, and that looks like overkill in the other direction.
I saw that volt meter "light" at one of the web sites. I might use that idea as well when the time comes. But I might wire it so the little lite is always on. (Rob's gonna give me that shaking finger for that idea.) But I don't think its much more draw than a clock, if even that.
Re: Modifications to my F800ST
Posted: Fri Aug 07, 2009 11:10 am
by CycleRob
Boxer wrote:I saw that volt meter "light" at one of the web sites. I might use that idea as well when the time comes. But I might wire it so the little lite is always on.


.
Re: Modifications to my F800ST
Posted: Mon Nov 23, 2009 2:38 pm
by CycleRob
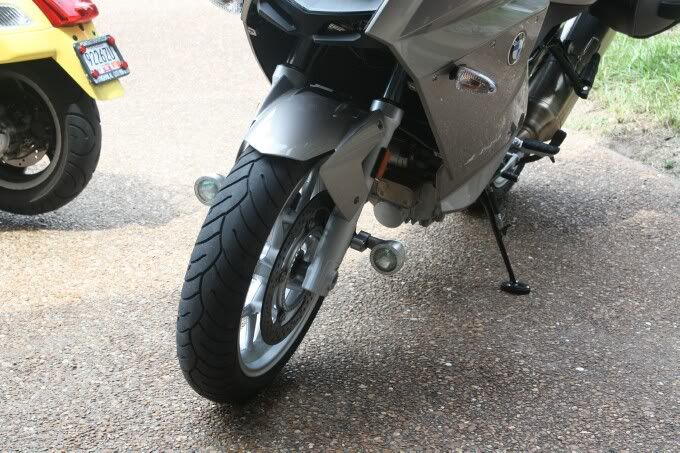
This was accomplished months ago, but I waited so there is no question now about it's durability, and I can therefore recommend it. The sidestand got so hot after welding that the water I slowly dunked it into flashed to steam.

No more worrying if the tiny stock sidestand foot will dig in hot tar or a firm lawn and cause tipover damage. Yes, I carry a 4" (102mm) blue plastic disk made just for that purpose (an Insurance Co promo), but the welded on foot is always there and more importantly, never forgotten.
EDIT: To change photo host away from PhotoBucket to faster, less intrusive Postimage.
.
Re: Modifications to my F800ST
Posted: Wed Nov 25, 2009 8:36 am
by Buckster
Nice mod....I wonder why the EOM stands wouldn't come that way....it just seems silly to me.
Re: Modifications to my F800ST
Posted: Fri Dec 11, 2009 4:28 pm
by touchton
Just got a Sargent seat and a LED tail/brake light for my F800ST. I won't have a chance to install either one this weekend, but hopefully I'll get around to in next week.
Re: Modifications to my F800ST
Posted: Thu Feb 04, 2010 1:54 pm
by CycleRob
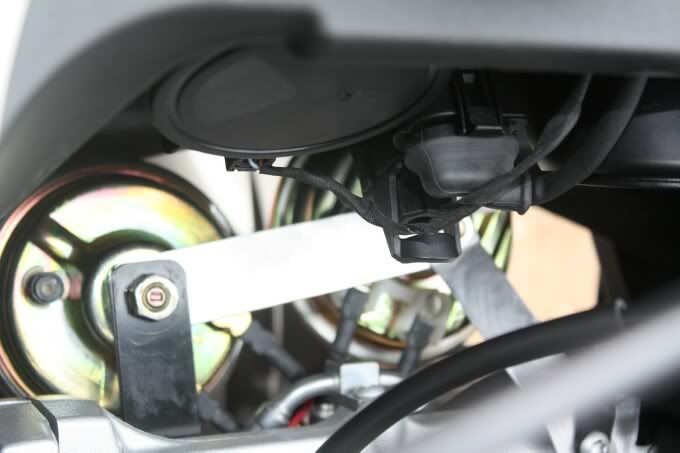
Another little gem added to my ride. I was thinking of adding this to the "Little things, greater satisfaction" post, but the part that was added extreme lack of availability pushes it into the more adventurous "mods" post. The rubber cable bellows was salvaged from a damaged/discarded clutch cable from a Japanese SportBike. I stumbled upon it looking in my "good junk" pile for something else and

knew exactly what to do with it! Unfortunately, that protective rubber cable bellows, in all my past experiences, is not available individually. In this picture below, besides that rubber protector there are 2 other mods that have already been documented.

BTW, Having lived 58 years in CT & PA, all you Northerners still getting even more snow, yesterday I went for a 22.1 mile (35.5km) ride in 55DegF (12.8DegC) sunshine about 4PM when my self imposed chores were completed. That was with no long-johns or my usual ski over-pants! Really runs sweet in the cold weather. When I turned the key off after the ride, I couldn't help but feel great about the whole experience, knowing exactly how nasty it was in freezing Chicago for my buddy
OU812 the same exact moment.
EDIT: To change photo host away from PhotoBucket to faster, less intrusive Postimage.
.
Modifications to my F800ST
Posted: Mon Feb 08, 2010 1:46 am
by CycleRob
If you ever see or sit on an F800S or ST model, one of the first oddball things you'll notice is the very out-of-place, tall and lanky front brake reservoir bracket. It holds that translucent plastic container waaaaay up there and waaaay out there, like it's definitely not the correct part. Really really bad!
From what I have read, the F800S and ST models originally had one like the K1200 bikes that mounts directly inside the master cylinder body. Then frothing of the brake fluid from engine or road vibrations caused air pockets where air should not be. The remote isolation bracket solution they came up with looks like it was a parts bin piece from an ATV. Hideous and misaligned. I disliked it so much I tried to see how easy it would bend as soon as I got home on day 1. Some riders have even spent the ~$45 for that K1200 reservoir, bolted it into place, and not reported any brake problems. That was just too expensive to me for just a cosmetic change. My answer, the usual: Make one from nothing. The "nothing" I used was a small rectangular .086" thick steel bracket used to hold wooden GoldWing crates together. I have a cleaned gallon paint can full of them that were salvaged during my early 1990's part time job in the Manchester (CT) Honda shop. The solid (good) crate wood was also discarded! Some of it became very sturdy Table/Bench/Shelving frames for the workshop, joined together by those same 2"x4" steel brackets. Anyway, those steel brackets are the gift that keeps on giving, now 18 years later, because of their convenient size and awesome strength:
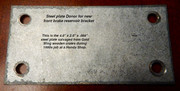
To start off, the old reservoir bracket comes off. Then I just grabbed the still hose attached reservoir and pulled it to the place where it belonged AND the new gentile bends of the hose allowed it to go. Next comes the hard part. Creating an accurate template made from cereal box cardboard so the steel one cloned from the template will fit perfectly. Here is the product developmental prototypes with the obvious, easy steps left out.
Click Thumbnails below, then click the big pic to go full size:
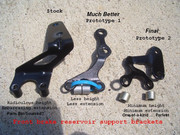
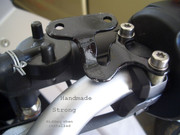
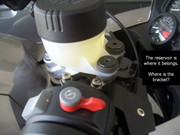
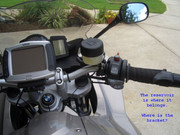
As you can see, it is so pulled down-and-snugged-in that it looks like BMW did it. It no longer pisses me off like when I see that stock front brake reservoir. It even looks normal for the Hi Tech bike it's mounted on.
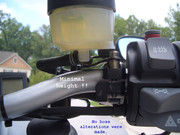
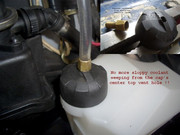
Here's another small mod that's totally hidden. The coolant recovery tank cap's added on top vent hose is about 6 inches long going straight up to nowhere, capturing minute coolant drops within it's sidewalls that later combine then drain back in. A tiny paper towel wad stuffed snuggly in the end contains water vapor and excludes road grime. The brass fitting drilled then screwed into the top of the cap came from a broken throttle cable. Since the clear hose has a slightly larger diameter, an interference fit was necessary. No more hot coolant odors or road bump induced weeping from an almost too full recovery tank.
EDIT: To change photo host away from PhotoBucket to faster, less intrusive Postimage.
.
Re: Modifications to my F800ST
Posted: Mon Feb 08, 2010 12:11 pm
by Mollygrubber
I love reading your posts, Rob. Makes me want to get an F8--- and 'fix' it.
Peter
Re: Modifications to my F800ST
Posted: Tue Feb 09, 2010 1:20 am
by CycleRob
Thanks.
Luckily, there aren't too many things that need "fix'n".
About the handmade bracket, I forgot to mention that the 2nd prototype's unique narrow waisted twist-n-turn shape
was intended to serve as a vibration damper. That's why the hideous stock bracket
exists in the 1st place!
So . . . . I closely studied the stock bracket, knowing lots of computer design time and brainpower must have been invested in it. Two big bends sharper than 90 degrees. The off-axis extension. An odd 4 sided cut-out mid length and the large metal mass area where the reservoir attaches surely have designed in dynamic tuning functions. Minimally thin in the middle and heavy at the end. Look at that top pic link above again. I incorporated all those basic design concepts from the clumsy looking stock part, only in a more graceful and very compact way. It's equivalent to a long narrow bracket, just coiled up to save space and putting the reservoir
where it belongs. The greater length of a straight, narrow band bracket dampens forces on the X & Y axis’s but not Z. Twisting it the way I did significantly covers all 3 axis’s. I bet you thought I was only trying to make it look cool.
BTW, For many months there have been no DOT-4 fluid frothing issues whatsoever.
Axis Info:
X=Left/Right
Y=Up/Down
Z=In/Out
EDIT: To change photo host away from PhotoBucket to faster, less intrusive Postimage.
.
Re: Modifications to my F800ST
Posted: Tue Feb 09, 2010 7:41 pm
by Mollygrubber
Ahhh... now I understand: "Enjoying retirement in Gainesville"
From my perspective, you are a lucky dog.
Did you ever consider showing that mounting bracket to BMW? It's genius, and should have been done in the factory, IMHO.
Peter
Re: Modifications to my F800ST
Posted: Wed Feb 10, 2010 12:59 am
by CycleRob
BMW will find it here, I'm sure. It's not that they aren't capable of making a design like that. Maybe they didn't have enough time when the "problem" surfaced and used a bracket from another bike. Maybe the harmonics for a compact one similar to my design wasn't good enough. Looking at the stock bracket, everyone almost says out loud . . . "
WHAT were they
THINKING??"


It doesn't even hold the reservoir level!
Genius? All I did was grab onto the hose attached reservoir and pull it into place, low & tight, then note the new 2 dimensional spatial coordinates of the 4 bolt holes by looking downward from above. Transfer that to the paper template, then add the 3rd dimension by lifting up the reservoir mounting holes, leaving a snakelike connecting link in between the 2 mounting points. Bingo. The bracket comes to life. A few hours of cutting, drilling, filing, bending and finally painting is all it takes.
.
Re: Modifications to my F800ST
Posted: Thu Feb 18, 2010 5:18 pm
by Buckster

Great job!
You must love tinkering....I love it too!
Modifications to my F800ST
Posted: Wed Apr 07, 2010 1:13 am
by CycleRob
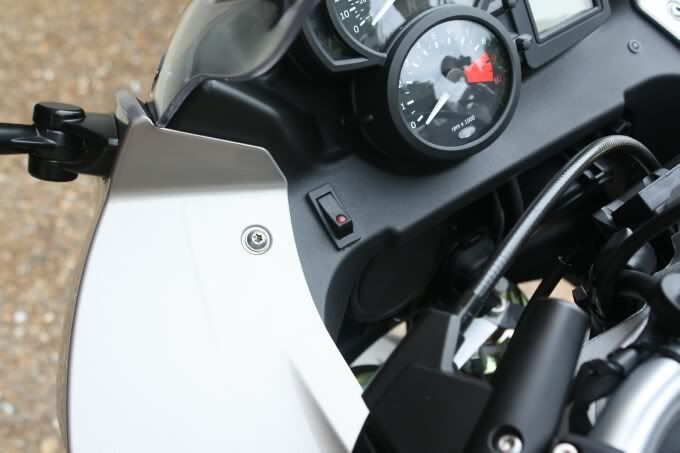
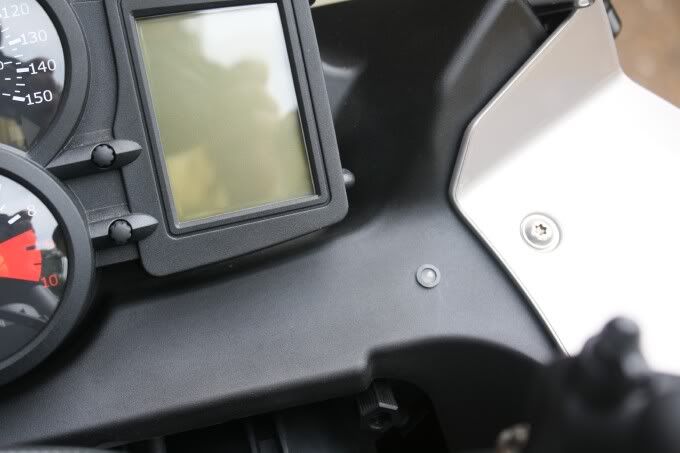
My latest mod . . . painting the stock windscreen black.
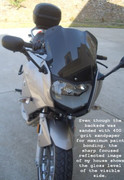
I have wanted to do this since last year. I've first seen this type of mod performed on the stock windscreen of an R-6 Yamaha SportBike many years ago. Even on close-up inspection, It looked
fantastic! The balance of the black seat/tires/windscreen parts to it's deep Yamaha blue solid color paintjob was very classy looking. I'm not sure if he sandpapered the windscreen's backside to strengthen the paint bonding, but I sanded mine with #400 grit until I could not see thru it. No turning back now! Laid it front face down on a 1 foot square folded towel, then applied 2 coats of Rust-oleum gloss black rattle can spray paint. Several hours drying time in the fierce Georgia sun between coats, and afterward.
Here's 2 more pics:
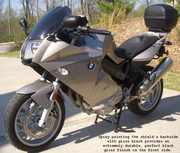
Riding the bike, the 3 LED voltmeter seems brighter in the subdued lighting. In bright sunlight, the instrument cluster wasn't much different. The forward view blockage is almost zero, because the shallow angle it's at in your field of view means you're not really looking thru very much of it to see what's in front of you. I haven't ridden it at night yet, but I'm sure the experience will be different. The paint surface of the backside is very rough looking, but not noticeably visible unless you intentionally look there. I am very pleased with the result.


EDIT: To change photo host away from PhotoBucket to faster, less intrusive Postimage.
.
Re: Modifications to my F800ST
Posted: Wed Apr 07, 2010 7:22 am
by Buckster
Looks good!

Modifications to my F800ST
Posted: Thu May 06, 2010 2:08 am
by CycleRob
Click Thumbnail below.
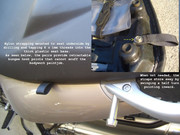
These straps are a simple little thing, but they again turned out to be very useful. I confess that the bungee mount straps were installed on my other bike, but before that they were an OEM installation on an R-6 Yamaha SportBike that became a dedicated racebike. That same bike also provided the same new horn used on the 50R and F800. On the R1150R, there already were threaded holes in the seat base, originally for the passenger hold-on seat strap . . . that got
removed on day 2.
The original plan was to drill a bolt hole, then about an inch (25mm) away a larger hole, to be used as an insertion point for the washer and nut. After I drilled the first pilot hole, the plastic was so thick, I realized it would be strong enough to be threaded. Making the threads, I didn't go the full tap depth that would have made a completed thread. Going part way provided a tighter female thread so the bolt would not come loose. I used a short 6 x 1.0mm hexhead bolt inside a short collar so the bolt could be tightened against the short collar. You can make your own collars by cutting a length of small Aluminum or Brass pipe with an ID slightly larger than the OD of the bolt threads. The 2 thickness’s of Nylon strapping are as thick as the collar is long, so the strap stays where you swing it to, and with the smooth surface, larger diameter collar, the holding shear strength is high. A short blast from a Propane torch melts the fuzz cuts or strands into a nice smooth surface.
I've very tightly bungee strapped a full 5 gallon red plastic fuel container on behind me using both straps with no loosening, so they are sound. The straps provide a hooking point that's conveniently where it needs to be -and- that hooking point swing-stores away under the seat when you don't need it.
So there you have it. Another simple useful mod that some of you tinkerers can do at little or no cost, if you are resourceful. More important than the no cost is the premium quality of nearly ALL the salvaged parts being used.
EDIT: To change photo host away from PhotoBucket to faster, less intrusive Postimage.
.
Re: Modifications to my F800ST
Posted: Sat May 29, 2010 8:31 am
by storman113
Touchton
"It's wired to the GPS power connector so it powers up with the ignition switch"
Where would one find the GPS power connector?
I really enjoy reading the mod's on this forum.

Re: Modifications to my F800ST
Posted: Sat May 29, 2010 11:38 am
by touchton
The GPS connector is wrapped up on the right side of the battery. You can buy a special cable that fits the connector, but I just cut the connector off and hardwired it. Electrically, this does energize with the ignition switch. When you turn the switch off there is a 30 or 60 second overhang, so it doesn't power down immediately. I also have my LED battery gauge wired to this circuit.